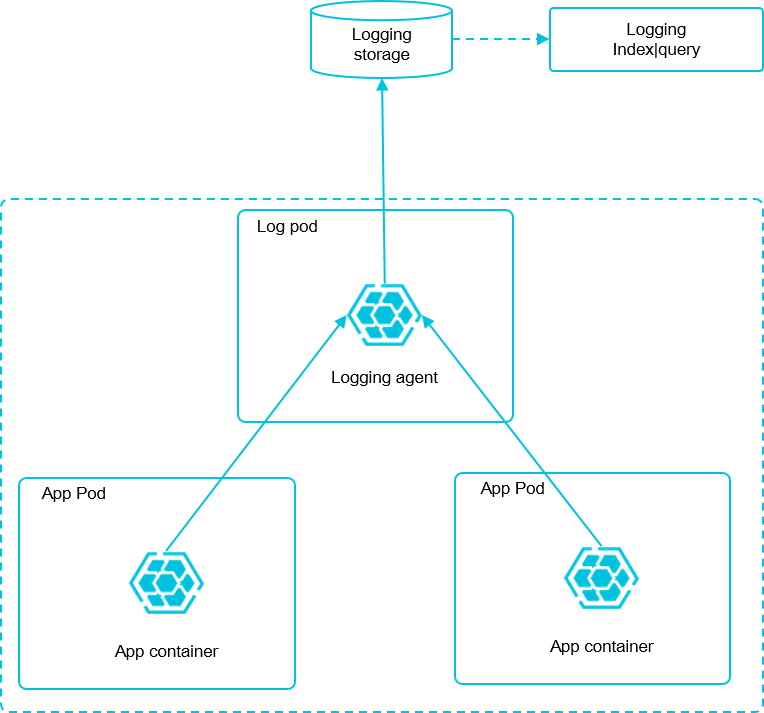
阿里云k8s+log-pilot日志收集
部署Elasticsearch集群
- 登录阿里云Elasticsearch控制台。
- 在Elasticsearch实例页面的实例列表中,单击实例ID/名称链接。
- 单击左侧导航栏的ES集群配置,进入ES集群配置页面。在YML文件配置区域框右侧单击修改配置,弹出YAML文件配置页面。
- 自动创建索引设置为允许自动创建索引,选中该操作会重启实例,请确认后操作。然后单击确认。
需要开启自动创建索引功能,版本最好选择6.3 或者6.7版本。
测试Elasticsearch集群
测试集群
1
| curl -XGET "http://name:passwd@es-cn-*******.public.elasticsearch.aliyuncs.com:9200/_cluster/health?pretty"
|
查看index
1
| curl 'name:passwd@es-cn-******.public.elasticsearch.aliyuncs.com:9200/_cat/indices?v'
|
部署Log-pilot组件
可以采用模板创建
1
2
3
4
5
6
7
8
9
10
11
12
13
14
15
16
17
18
19
20
21
22
23
24
25
26
27
28
29
30
31
32
33
34
35
36
37
38
39
40
41
42
43
44
45
46
47
48
49
50
51
52
53
54
55
56
57
58
59
60
61
62
63
64
65
66
67
68
69
70
71
72
73
74
75
76
77
78
79
80
81
82
83
84
85
86
87
88
89
90
91
92
93
94
95
| apiVersion: apps/v1
kind: DaemonSet
metadata:
name: log-pilot
labels:
app: log-pilot
# 设置期望部署的namespace。
namespace: kube-system
spec:
selector:
matchLabels:
app: log-pilot
updateStrategy:
type: RollingUpdate
template:
metadata:
labels:
app: log-pilot
annotations:
scheduler.alpha.kubernetes.io/critical-pod: ''
spec:
# 是否允许部署到Master节点上tolerations。
tolerations:
- key: node-role.kubernetes.io/master
effect: NoSchedule
containers:
- name: log-pilot
# 版本请参考https://github.com/AliyunContainerService/log-pilot/releases。
image: registry.cn-hangzhou.aliyuncs.com/acs/log-pilot:0.9.6-filebeat
resources:
limits:
memory: 500Mi
requests:
cpu: 200m
memory: 200Mi
env:
- name: "NODE_NAME"
valueFrom:
fieldRef:
fieldPath: spec.nodeName
- name: "LOGGING_OUTPUT"
value: "elasticsearch"
# 请确保集群到ES网络可达。
- name: "ELASTICSEARCH_HOSTS"
value: "{es_endpoint}:{es_port}"
# 配置ES访问权限。
- name: "ELASTICSEARCH_USER"
value: "{es_username}"
- name: "ELASTICSEARCH_PASSWORD"
value: "{es_password}"
volumeMounts:
- name: sock
mountPath: /var/run/docker.sock
- name: root
mountPath: /host
readOnly: true
- name: varlib
mountPath: /var/lib/filebeat
- name: varlog
mountPath: /var/log/filebeat
- name: localtime
mountPath: /etc/localtime
readOnly: true
livenessProbe:
failureThreshold: 3
exec:
command:
- /pilot/healthz
initialDelaySeconds: 10
periodSeconds: 10
successThreshold: 1
timeoutSeconds: 2
securityContext:
capabilities:
add:
- SYS_ADMIN
terminationGracePeriodSeconds: 30
volumes:
- name: sock
hostPath:
path: /var/run/docker.sock
- name: root
hostPath:
path: /
- name: varlib
hostPath:
path: /var/lib/filebeat
type: DirectoryOrCreate
- name: varlog
hostPath:
path: /var/log/filebeat
type: DirectoryOrCreate
- name: localtime
hostPath:
path: /etc/localtime
|
在集群管理页左侧导航栏中,选择工作负载, 守护进程集,可以查看到log-pilot,有多少个node,就会创建多少个容器。
主要这里有坑。官方文档上,默认yml配置使用的参数和log-pilot的镜像版本不对。需要使用0.9.6-fluentd版本,这里我使用官方版本,部署成功后,日志一直无法上报到Elasticsearch集群。查询一天,才解决这个问题。
采集日志
部署容器,可以参与官方的测试。也可以自己部署
aliyun_logs_catalina=stdout表示要收集容器的stdout日志。aliyun_logs_access=/usr/local/tomcat/logs/catalina.*.log表示要收集容器内/usr/local/tomcat/logs/目录下所有名字匹配catalina.*.log的文件日志。

label 说明
您还可以在应用容器上添加更多的标签。
1
| aliyun.logs.$name = $path
|
- 变量
name 是日志名称,只能包含 09、az、A~Z 和连字符(-)。
- 变量
path 是要收集的日志路径,必须具体到文件,不能只写目录。文件名部分可以使用通配符,例如,/var/log/he.log 和 /var/log/*.log 都是正确的值,但 /var/log 不行,不能只写到目录。stdout 是一个特殊值,表示标准输出。
1
| aliyun.logs.$name.format
|
日志格式,目前支持以下格式。
- none:无格式纯文本。
- json:json 格式,每行一个完整的 json 字符串。
- csv:csv 格式。
上报日志时,额外增加的字段,格式为
每个 key-value 之间使用逗号分隔,例如
1
| aliyun.logs.access.tags="name=hello,stage=test"
|
上报到存储的日志里就会出现
字段和
字段。
如果使用 ElasticSearch 作为日志存储,target 这个 tag 具有特殊含义,表示 ElasticSearch 里对应的 index。
Kibana
可以使用阿里云官方ElasticSearch 的kibana,在可视话,点击kibana,跳转网址登陆,就能查看。
创建index
app/management/kibana/spaces
kibana 索引模式,创建索引模式
查看index
查看索引app/discove,可以选中创建的索引模式,选择时间段搜索
参考文章
https://help.aliyun.com/document_detail/86552.html
https://blog.csdn.net/xiaojax/article/details/105438607
https://help.aliyun.com/document_detail/50441.html#h2-url-2

